How to Fix Windows Photo Viewer Not Printing?
Windows Photo Viewer enables you to print directly through the application. But certain times, once you provide the print job, you may face the ‘Windows Photo Viewer, not printing’ problem. So, if you are facing a similar issue, then here are the instructions provided below.

SOURCE:-How to Fix Windows Photo Viewer Not Printing?
Extracting the Zip File Before Printing
- If you attempt to print through a zip file without extracting the file, maybe you should not be capable of printing.
- Then select the zip file, and right-click on it then choose the Extract button.
- You should launch the extracted folder.
- Thereafter, invoke the image in Windows Photo Viewer.
- Now, attempt printing the image and look for any improvements.
Set the Standard Printer
- Hold the Windows and R buttons altogether over the keyboard to invoke the Run section.
- After that, input ‘control’ into it and select the OK button to invoke the Control Panel.
- You should reach the Hardware and Sound option.
- Go to the ‘Devices and Printers’ option and click on it.
- Reach the installed printers list and right-click on the desired printer.
- You have to choose the option of ‘Set it as a default printer,’
- Now, shut the Control Panel screen.
- Finally, invoke the application of Photo Viewer and look whether you should print now.
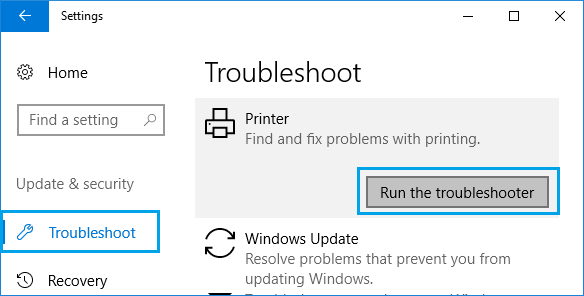
Perform Printer Troubleshooter
- You should select the Start menu and click on the Settings.
- After that, choose the ‘Updates and Security’ option.
- Then move down and select the Printer option.
- You have to choose the button of ‘Run the Troubleshooter.’
- Thereafter, pursue the on-screen steps and save the suggested fixes.
- Now, shut the troubleshooter then look for any improvements.
Add the Printer Again
- You have to reach the Start menu and choose the Settings option.
- Then choose the Devices option.
- Go to the ‘Printers and Scanners’ option.
- Thereafter, select the button of ‘Add a printer or scanner.’
- Don’t forget to connect the printer to the system.
- Later, choose the printer through the list once you detect and on-screen steps to finish the setup.
- Now, invoke the application of Windows Photo Viewer and look for any improvements.
Set Windows Photo Viewer as Standard
- Go to the Start menu on your system.
- Then choose the Settings option.
- You should choose the tab of ‘Default apps.’
- Thereafter, move down to the Photo viewer.
- Navigate to the option of ‘Choose a default.’
- Later, move via the applications then choose the Windows Photo Viewer through the list.
- Now, shut the Settings screen and look for any improvements.
Jack Arona is a creative person who has been writing blogs and articles about cybersecurity. She writes about the latest updates regarding mcafee.com/activate and how it can improve the work experience of users. Her articles have been published in many popular e-magazines, blogs, and websites.