How to Set up Advanced Display Settings on Windows 10?
Facing an issue on Windows 10 where the user fails to get to the Advanced Display Settings is a common one, especially since the 2019 fall creator update. So, here are the steps to set up advanced display settings on Windows 10.
Setting a Custom Color Profile
If you want to set a custom color profile on Windows 10, then you can follow the provided steps.
- First, you have to launch Settings on your system.
- Then go to the System.
- You should select Display.
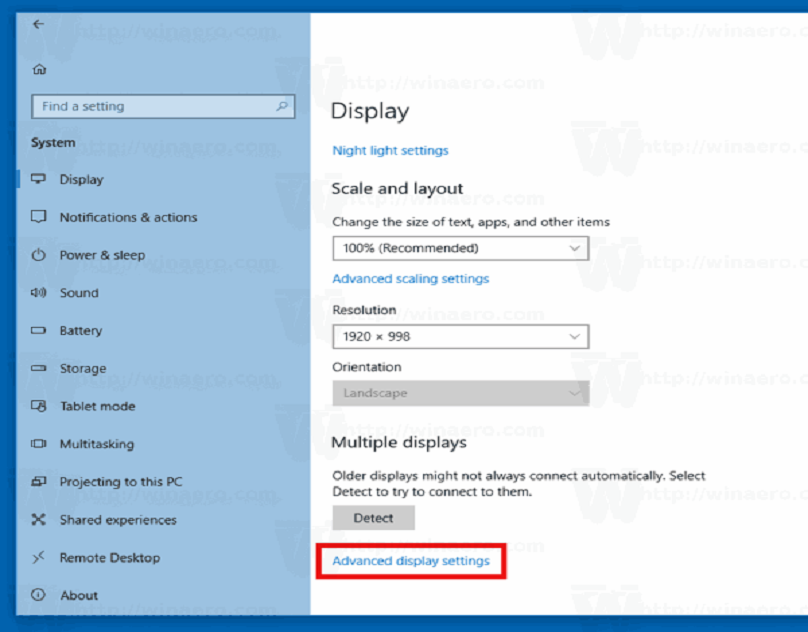
- Go to the Advanced Display Settings option.
- Now, go to the Display adapter properties option for the screen you would like to adjust a custom color profile for.
- Navigate to the Color Management option.
- Select the Color Management button.
- You have to choose the Devices button.
- Go to the list and choose a display.
- Tick the box of “Use my settings for this display option.
- Navigate to the Add option.
- Go to the “Associate Color Profile” screen, select the Browse option, and find the new color profile.
- You should twice click on the “.icm” file to install the new profile.
- Now, select the Close tab.
Modifying the Refresh Rate
If you want to modify the refresh rate on Windows 10, then pursue the instructions given below.
- You have to launch settings.
- Then you should select the System.
- Select the Display.
- Go to the Advanced display settings option.
- Now, navigate to the Display adapter properties option for the screen you would like to modify the refresh rate.
- Select the Monitor button
- Beneath the “Monitor Settings” field, go to the drop-down section to adjust the right refresh rate.
Using Taskbar on Multiple Displays
If you want to show the taskbar on multiple displays, then you can follow the provided steps.
- First, launch the Settings on your system.
- After that, go to Personalization.
- You should select the Taskbar.
- Beneath the “Multiple display” field, toggle “Show taskbar on all displays to the “On” position.
Related Articles:
Modify Background on Multiple Displays on Windows 10
If you want to modify the background on multiple displays on Windows 10, then pursue the instructions given below.
- You should launch Settings.
- Navigate to the Personalization.
- Then select the Background.
- Beneath the “background” drop-down section and choose the Slideshow button.
- Go to the Browse option.
- Choose a folder with a collection of pictures that you want to display on the monitors.
- Select the “Choose this folder” option.
- Beneath the “Change picture every” drop-down section to choose the turning round frequency.
- You have to switch the toggle of Shuffle to enable it.
- Alternatively, when you are using various size pictures, use the “Choose a fit” drop-down section, and choose the Fill option.
Personalizing Every Monitor with a Different Background
If you want to personalize every monitor with a different background, then you can follow the provided steps.
- To get started, launch the Settings.
- Then you should select Personalization.
- You should select a Background.
- Navigate to the Background’s drop-down section and choose the Picture option.
- Click on the Browse option.
- You should search to the location with the pictures, choose the wallpaper, and go to the “Choose picture” option.
- Navigate to the picture and right-click on it and choose the monitor you would like to the wallpaper to display.
- Now, once you finish the instructions, every monitor will show a custom wallpaper.
Ryan Smith is a self-professed security expert; he has been making the people aware of the security threats. His passion is to write about Cyber security and office utilities, cryptography, malware, social engineering, internet and new media. He writes for Microsoft products at office.com/setup.